Thursday, November 17, 2011

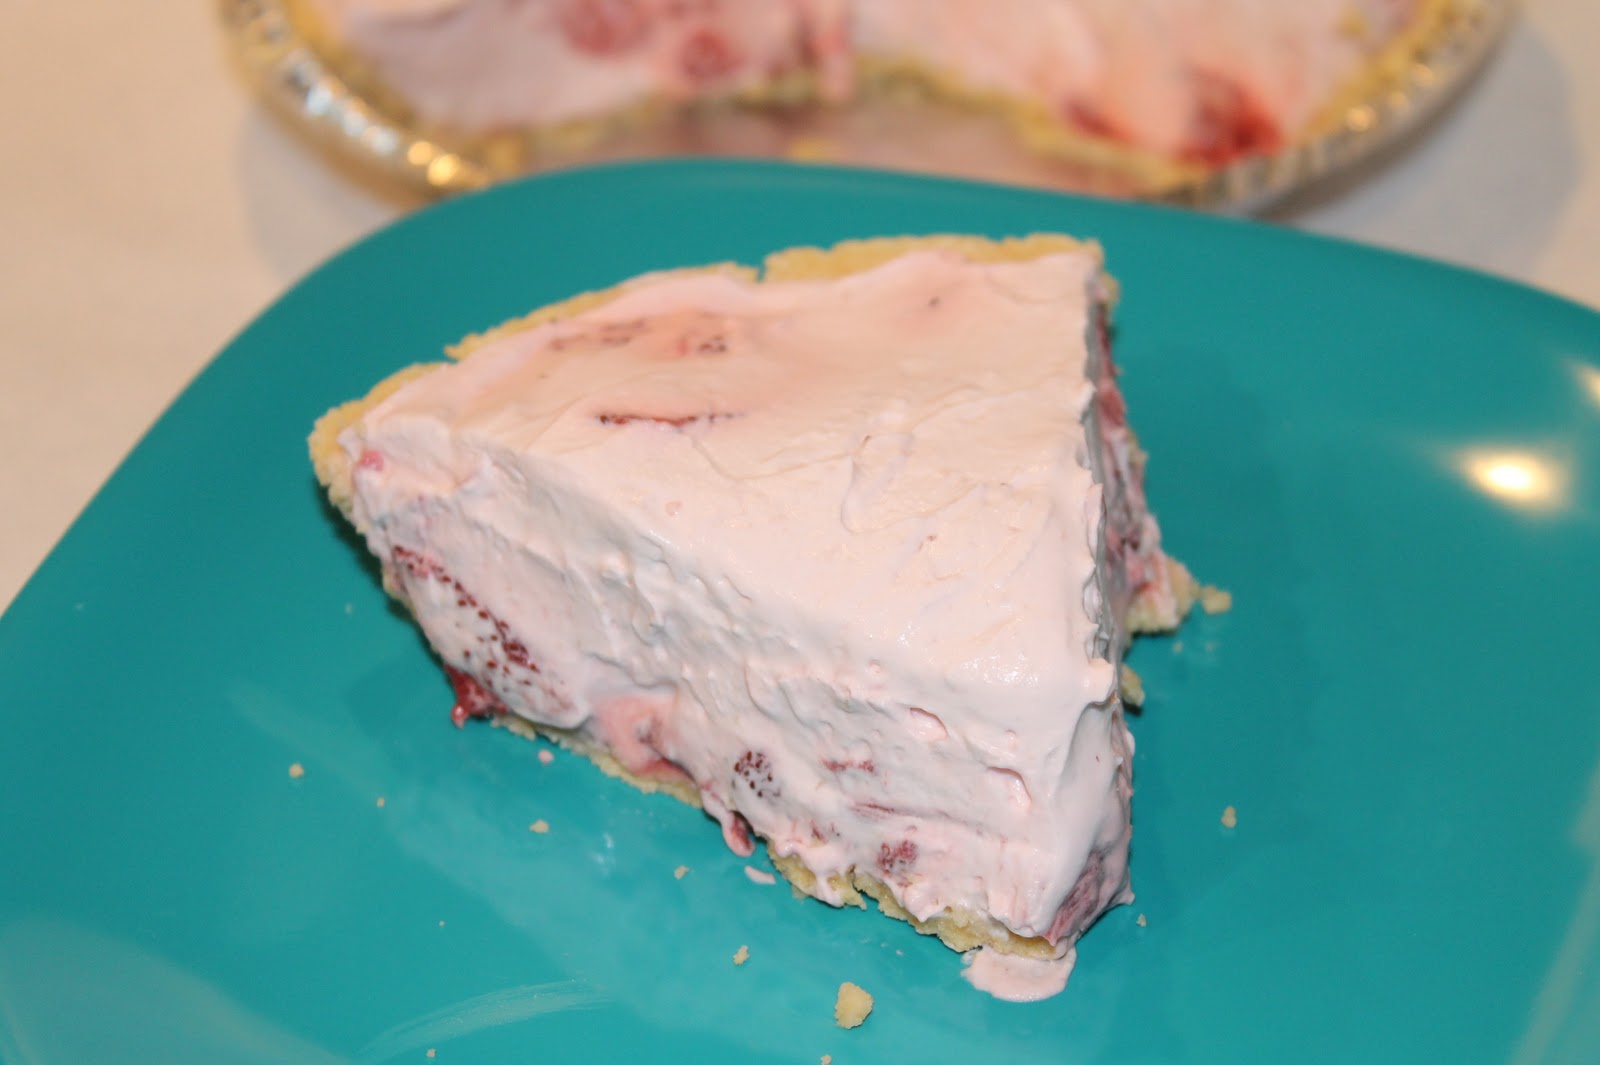
Strawberry Dream Pie

I came up with this recipe because I found a good deal on some strawberries and was trying to think of a different way of using them.  When I went looking for a dream pie recipe, all the ones I found included using gelatin.  While that in itself is not necessarily bad, in my opinion for a recipe like this, it is an unnecessary step.  So this recipe uses NO gelatin! Just sugar, strawberries, arrowroot, whipped cream, and a pre-made pie crust.  Now, this is not nearly as simple or quick as that 5-Min No-Bake Pumpkin Cheesecake I came up with, but it's really not that far off.  ;)

Originally I made this pie for Miss Julia's (my son's daycare provider) birthday. She & her family (including 2 teen boys) have been generously taste-testing my baked goodies as I created them for this blog.  But I wanted to give to her for her birthday something that was light, fruity, and not overtly sweet. :)  I think I scored with this one.  I can only imagine that it'll also be ideal as a summer dessert, with the combination of strawberries and whipped cream... :)


Ingredients:
1 pint strawberries
1 C sugar
1 Tbsp thickening agent - arrowroot or corn starch
1½ C heavy whipping cream
4 packets non-sugar sweetener (like Splenda) or 2 Tbsp powdered sugar
1 ready-made shortbread pie crust


Directions:
Wash & remove leaves from strawberries.  Cut up entire pint by halves or quarters.


Put cut strawberries in a large saucepan, add sugar and thickening agent.  Heat saucepan on high until sugar dissolves; turn heat down to medium-high and simmer until fruit has softened and sauce is bubbling, about 15 minutes.  Be sure to stir constantly. 


Once fruit has softened and sauce has thickened, remove from heat and cool completely, minimum 2 hours.  (To speed cool, immerse saucepan in a large mixing bowl full of icewater and stir strawberry sauce for 10 minutes until completely cooled.)

While strawberry sauce is cooling, place whipping cream into mixing bowl.  Add sweetener.  Using the whisk attachment, beat whipping cream on high speed until cream has thickened and is stiff.  Set aside and refrigerate. 


When strawberry sauce has cooled off completely, take whipped cream out and fold sauce into the cream using a spatula (do not use whisk).  Blend well. 


Pour mixture into pie crust and spread evenly. Can serve immediately or cover & refrigerate and serve later.


Makes 6-8 servings.

~~~~~
GBAdams
11/02/2011

Friday, November 11, 2011

Brown Sugar Sauce Topping

Ingredients:
8 Tbsp butter (1 stick)
1½ C brown sugar, packed
½ tsp salt
1 tsp vanilla
½ C water

Directions:
Melt butter in a small saucepan over medium-high heat.  Add brown sugar, salt, vanilla, and water.  Whisk briskly to avoid mixture from burning. Bring to a boil; simmer for 1 minute, or until sauce starts to bubble and rise. Let cool about 5-10 minutes & serve while still warm.  Sauce is ideal drizzled over bread pudding, ice cream, etc.

~~~~~~
GBAdams
11/11/2011

Friday, November 4, 2011

7-Up Can Chicken

I never tried doing a 7-Up can chicken before.  (Conventionally, this is called "Beer Can Chicken" because a beer can is used, but we hardly ever have beer in the house, so I experimented using the soft drink instead.)  I'd always heard that a chicken roasted this way makes it succulent and super-moist, and I was pleasantly surprised to find all the rumors were true.  ;)  I've made it many times, and while the skin is deliciously crispy, the meat practically overflows with juiciness.  Even the breast meat.  I hope you try this and enjoy it as much as we do!  :)

Couple of things to note: It's a good idea to use gloves (vinyl, latex, nitrile, etc.) when rubbing the spices into the chicken, on both the interior & exterior. If you have nails like I do, it will save discoloration of your fingernails from the paprika.  Also, I alternate the sides for this, from roasted-alongside veggies, to Cripsy Smashed Potatoes & Carrots.  They're both excellent & simple-to-make sides with this chicken.  Yum!


Just a sampling of some of the ingredients needed...
Ingredients:
Dry rub--
½ C brown sugar
2 Tbsp Kosher salt
2 Tbsp garlic powder
1 Tbsp paprika
2 tsp tarragon
1 tsp coarse ground black pepper

Can marinade-- 
½ can 7-Up
¼ C chicken stock
¼ C soy sauce
¼ rice wine vinegar

Directions:
Make chicken rub -- Using an an airtight container, mix all the sugar & spices by pouring into container, sealing, and then shaking. Makes enough rub for 2 whole chickens.  If only roasting one chicken, divide in half and store unused spices in an airtight container.


Preheat oven to 375°F and ensure that wire racks are placed as low as possible.  Empty ½ of the 7-Up so there is room for the other liquids in the can. Pour chicken stock, soy sauce, and rice wine vinegar directly into the can so they're all mixed together.  Generously sprinkle about ⅓ of the spices inside the chicken cavity, rubbing it in as much as possible. Place the now-full 7-Up can in the middle of a shallow pan. Carefully place chicken onto the can by the cavity. Using the remainder of the rub mixture, cover the entire exterior of the chicken (including under the wings!) and massage the spices into the skin, coating evenly.


If desired, baby potatoes and other vegetables can be spread around the base of the pan around the chicken for simultaneous roasting.  Place pan (uncovered) in pre-heated oven on the lowest rack possible.  Roast for 1h 30m.


Let rest for at least 10 minutes after removing from the oven and before serving.  Serve with roasted vegetables, or can also be served with Cripsy Smashed Potatoes & Carrots.  ;)


~~~~~
GBAdams
09/20/2011

Cripsy Smashed Potatoes & Carrots

Meet my new favorite way of serving potatoes!


Ingredients:
1 bag baby potatoes (Yukon golds are best, but can use baby reds, no more than 2-in diameter)
3-4 C baby carrots
6 C water
¼ C kosher salt
1 Tbsp garlic powder
1 Tbsp canola oil
2 Tbsp butter

Directions:
In a large pot, add kosher salt and garlic powder to the 6 cups of water.  Bring to a boil. When water is at a rolling boil, add potatoes and carrots.  Boil until potatoes are fork-tender, about 10-15 minutes.  Drain & set aside to cool.  When potatoes are cooled down, smash them by placing a flat-bottomed bowl or small plate over each and pressing down gently. 


You want the potatoes to somewhat retain their shape, but are flattened and have at least one side "cracked." If you smash them to the point that they are in pieces, it will make it challenging to get them crispy and in nice round, shapes. Heat up a large frying pan, on medium-high heat, then add canola oil and pats of butter. (Canola oil will help keep the butter from burning.) When butter has melted, add potatoes and carrots. Fry on each side, 4-5 minutes, or until side has started to brown. Remove from heat and serve with a roasted meat dish, such as 7-Up Can Chicken. ;) Sprinkle with a pinch of kosher salt and sprigs of rosemary, if desired.


Makes about 5-6 servings.

~~~~~
GBAdams
10/23/2011

Wednesday, November 2, 2011

5-Minute No-Bake Pumpkin Cheesecake

Here's a recipe for those of you who are severely time-constrained but have to come up with a dish or dessert, like for a potluck.  It is unbelievably easy and quick to make, and will probably be a hit at the dinner table or whatever event you might bring it to.  ;) 

I made this up on a whim last night without having had the benefit of a prior recipe as a starting point....so I'm relieved to say it turned out pretty good!  ;)  I have tried to see if there's another recipe out there just like it, but so far I've had no luck in finding one, which is surprising considering I'm using pre-made cheesecake filling.  You'd think there'd be a ton of recipes out there for this filling, but not so much that I've found.  (If you do find one, let me know, would you??)


Ingredients:
1 tub Cheesecake Filling
½ can pumpkin (about 7-8 oz)
1 Tbsp pumpkin pie spice
1 pre-made graham cracker pie crust

Directions:
Take out pre-made pie crust & remove the plastic lid.  Set aside.  In a bowl, empty tub of cream cheese filling.  Add canned pumpkin and the tablespoon of pumpkin pie spice.  Fold in and mix well. Pour into pie crust. Ready to serve as is, or you can cover and chill for serving later.


Makes 8 servings.

~~~~~~
GBAdams
11/02/2011

Basic (Chinese Sausage) Fried Rice

Here's a basic recipe for my favorite kind of homemade fried rice.  It's what I grew up on, and is a formula that I've seen countless times in restaurants. My parents used to make a sort of crepe/omelet with the eggs, remove them, dice them, and then return them to the pan, but that's always been so labor-intensive. And I could never get a flat, thin omelet to cut up.  However, in observing how Chinese restaurants cook their food, I started doing it this way.  MUCH more efficient.  ;)

The key for this dish is to ensure everything is ready ahead of time, so all you have to do is add & stir and keep the food moving.  Also, use as high/hot heat as you can stand.  (These kinds of foods especially make me yearn for a professional-type high BTU burner. Like 10,000 BTUs. Hee!)  As with any kind of stir fry, the key to the crispness & flavor is to get it cooked as fast as possible to sear it all in. Basically, you add ingredients, stir, add, stir, etc., until your dish is done. 


I forgot to capture diced onions & garlic, but they are a part of this.
 Ingredients:
6-8 C cooked, plain sticky rice. (Day-old leftovers work best)
2 C Chinese sausage, diced
3 eggs, slightly beaten
3 C peas (frozen are OK)
3 cloves garlic, finely chopped
1 small onion, diced
1/4 soy sauce (can use reduced-sodium)
3 Tbsp sesame or canola oil


This is Chinese sausage, diced.

Directions:
In a wok or high-sided skillet, heat pan on high and add oil. Add onion and saute for 2-3 minutes, then add garlic. 


When onion has just started to become translucent, add Chinese sausage and continue to stir quickly. Then add the eggs, making sure to vigorously stir so that scrambled eggs don't clump too much and are broken up into small pieces. Once eggs are no longer runny, add peas.


Stir for another 3-4 minutes, then add rice. Drizzle soy sauce over rice, distributing as evenly as possible.  Fold rice over and over to incorporate the rest of the ingredients and to ensure even coverage of soy sauce. If there are any big clumps of rice left, this is the time to break them up so they can get covered, too. Continue to stir for another 5-7 minutes, or until fried rice is well incorporated.


Fried rice can be served as a side or as a main course.

~~~~~~
GBAdams
10/29/2011

Monday, October 31, 2011

Holiday Cake Pops

I've tried cake pops only a couple of times before, from Starbucks and from a local bakery, and they were DIVINE.  But they're always relatively expensive, and I thought, "There's gotta be a way to make these at home."  Or at least customize them.  So I did a little research, and here's what I came up with.  The pictures here are Halloween cake pops only because I'm making them during October, but obviously they can be made at any time and decorated any way you like.  :)  I will definitely be trying to make these at other times of the year.  Stay tuned.  ;)

So, before I begin, I thought I'd share some of the stuff I learned along the way while making them.  If you've ever worked with either candy and/or colors (such as with fondant or icing), then some of these observations will not be new to you.  But for an amateur/novice like me, these are things I wish I knew ahead of time.

What I learned from this experience:
  1. When trying to make the orange color in melted candy, equal parts red + yellow  ≠ orange.  It ends up being more like a reddish-peach-pink.  Emphasis on the pink.  :( My advice would be to start with yellow candies and add red until the desired orange shade is achieved.  That and/or buy yellow candy color to add. Either way, buy way more of yellow than red candies to melt.  ;)
  2. Formed cake balls are HEAVY on lollipop sticks.  Do not skip any of the refrigeration steps.  They are your friend.  And don't make them any bigger than golf ball sizes.
  3. Using a double-boiler or fondue pot is probably your best bet for keeping the melted candy pliable and in a consistent state.  Yes, the candy is most likely microwaveable, but to do more than a couple of cake pops will require the melted candy to be in a constant melted state, and the cycle of microwaving-cooling-microwaving may alter the consistency of the candy.
  4. Do not use a wire rack to place your freshly-dipped pops. Use waxed or parchment paper.  Trust me on this.
  5. The nice round pop-shape is difficult to do for first-timers; I recommend doing a caramel apple-type of pop instead until you get the hang of it.
And with that, I bring you Holiday Cake Pops...


Ingredients:
Cake portion
1 package cake mix
eggs, oil, etc., according to package directions
1 can of frosting (do not use whipped frosting; regular or homestyle is best)


Pops
Candy melts - get at least 1 bag of white, then whatever colors will comprise the shades you'll need for your occasion
Lollipop sticks
Cookie frosting or cake icing (don't use the gel form, solid icings work best)
Candy food coloring (if needed)
Decorator sugar, sprinkles, etc.
1-2 tsp canola oil, as needed

Directions:
Bake cake according to package directions.  It's best if you bake in a 9x13 pan since you'll be working with it later. 


Let cool completely (about 3 hours or more).  Crumble entire cake into a large bowl. 


Add frosting; start with 1/2 the can and add more as needed.  Cake mixture should be moist, not overly frosting-y or greasy.


Cover bowl and chill 15-30 minutes.  After chilling, take scoopfuls of cake mixture and roll into golfball-sized (or smaller) balls. Don't make them any larger or they'll be unwieldy when dipping in melted candy later. Chill.

As I learned later, this is too large. ;)

While cake is chilling again, melt a small amount of candy in a microwave-safe bowl; it's best if it's the same color or close to the finished color you plan to use for the pops.  Or you can always use white.  :)  Take out cake balls from the fridge.  Take lollipop sticks and dip one end into melted candy. Insert all the way into each ball.  Chill again. 


Melt a larger amount of candy (3-4 cups) in a double-boiler according to candy specifications. Consistency should be smooth and not too thick (should be thinner than pudding); if melted candy is too thick, add *drops* of oil a little at a time and stir in. 


Take balls with pop sticks out of the fridge.  Carefully take each ball by the stick and dip/dredge in melted candy to completely coat. Place on waxed or parchment paper.

Don't do what I did here...use waxed paper to rest them on!

Dust with sprinkles, non-pareils, decorator sugar, etc (whatever you decide is best for your occasion). Return to refrigerator.  After another 15 minutes, cake pops are ready for cookie frosting for final touches, or are ready to serve as is.  If not serving immediately, cover in a tall, air-tight container and return to refrigerator.


Ready for transporting & gift-giving!

Makes about 30 pops.

~~~~~~
GBAdams
10/07/2011